- Home
- Comprehensive guide to micro frontends
Comprehensive guide to micro frontends
If you've already used microservices, you already know the huge benefit it provides to reduce architecture complexity of large monolithic backends. However, on the frontend side, many huge apps are still monolithic and hence are huge codebases with many dependencies.
Welcome everyone to a new story on Devspedia. Today we'll be talking about micro frontends, what are they, how you can use it, and what are the benefits of using such technique.
Micro frontends are basically about splitting larger frontend apps into smaller, manageable and independent pieces. In this way, each piece of your app (for example user's orders list) is reusable, independent and deployable on it's own.
Don't get confused with reusable Vue or React components, because a micro frontend technique treats each piece as a separate independent frontend app.
Practical example
Let's take a YouTube! video page as an example. In this case we can see at least 3 micro frontends highlighted in the screenshot below:
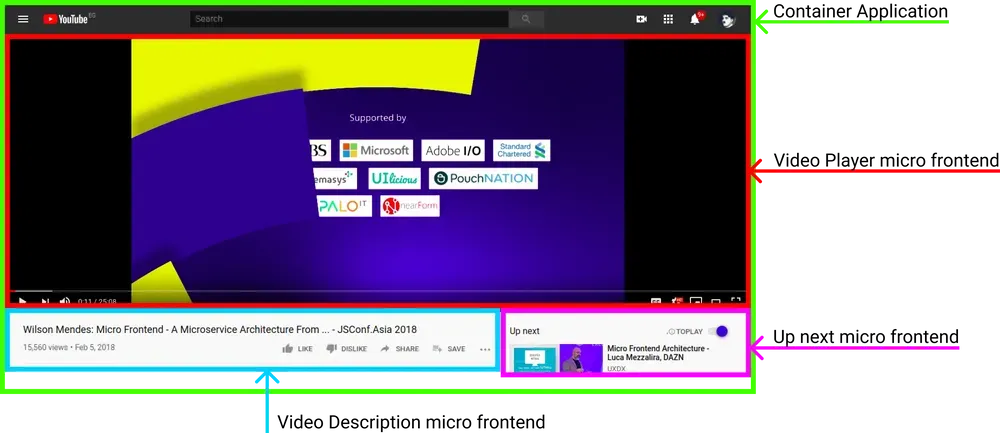
Container Application
The container application is the main application frontend which is responsible for loading child micro frontends and is also responsible for managing cross-cutting functionalities such as authentication, website navigation, user info, ...etc.
Micro frontends
Other micro frontends such as:
- Video player.
- Video description.
- Up next.
Let's assume each of these micro frontends have a dedicated team working on it, each team should be able to independently develop, deploy and deliver/release without being dependent on or blocked by any other team.
Micro frontends allows exactly that. Each piece/micro frontend is an entirely separate frontend code base, and is not blocked by or depending on anything else inside of the application container.
Why should I design my frontend this way?
Well, many reasons in fact, let's take a look
- Easier incremental upgrades: Imagine having a huge monolithic codebase, which it's technologies are getting outdated overtime, code refactoring and upgrades are a huge pain, to the point that push you to always delay it as much as possible, it's scary. With micro frontends, you can (ex above) even rewrite the entire video player, including underlying technologies without affecting any other micro frontend within the container.
- Decoupled code bases, enforcing good decisions, and making bad decisions harder to take: Each micro frontend is a decoupled code base, so that makes taking decisions such as sharing functionalities between different decoupled micro frontends becomes difficult and painful, also being explicit about inbound/outbound data and data flows between micro frontends becomes a natural practice.
- Faster and easier releases: Each micro frontend should have it's own code repo, build and test pipeline, and deployment to production, this enable the team who's working on one micro frontend worry much less (almost none) about other micro frontends, whether they're ready, not ready, broken, or whatever, once for example the video player is released, it can be shipped independently and will work properly even if other neighbor micro frontends are having issues, and the other way around.
- Micro frontend, micro team: Welcome to smaller, focused teams. Let's say you have a micro frontend for the shopping cart. The shopping cart team can actually own all of shopping cart feature from ideation to production, so portions within the team like styles, forms, validations, ...etc are all within that team, and they're not blocked by any other part of the application.
How can I implement micro frontends?
There are many ways, let's briefly highlight a few.
Server-side template composition:
You can use server side template composition using any of your favorite types of server side language to basically create the application container, and then compose other micro frontends inside of it via a template language of choice, ex:
<html>
  <head>
    <title>Example</title>
  </head>
  <body>
    <!--# include file="path/to/micro-frontend entry HTML file" -->
  </body>
</html>Build time, via node modules:
Other developers prefer using node modules for managing micro frontends. Take
a look at this
package.json example:
{
  "name": "@google/youtube",
  "version": "1.0.0",
  "description": "Video sharing app",
  "dependencies": {
    "@google/video-player": "^1.2.3",
    "@google/next-up-videos-list": "^4.5.6",
    "@google/video-description": "^7.8.9"
  }
}This obviously seems more flexible than the previous example. In this implementation each micro frontend is a separate node module, which our container application can include at build time.
However, there's a downside for this approach, which is having to make a new container application release every time one of the micro frontends is updated, because we'll need to use the new version of this node module, build again, and finally release. This leads us to think of other solutions that are executed in run-time instead of build-time to allow greater release flexibility.
Inject micro frontend in run-time via JavaScript
This is a very flexible approach. In this approach we'll include a JavaScript file in our container application, and then use the APIs provided by that file to actually inject the micro frontend inside the container application.
<script src="https://video-player.google.com/bundle.js"></script>This file then allows us to render that micro frontend where we want, when we want via consistent APIs that we design.
Ex:
window.videoplayer.mount(document.getElementById('video-player'))
We can run this command in our router, or based on some event,.. etc.
Inject micro frontend in run-time via Web Components
This is another very flexible approach, but of course, browsers support are lacking a bit here. In this example instead of injecting via JavaScript, we actually create a custom DOM element and mount it somewhere.
Ex: (after adding the script file to the head as in previous example)
const appContainer = document.getElementById('app-container');
const videoPlayer = document.createElement('video-player');
appContainer.appendChild(videoPlayer);Styling
Styling of each micro frontend should be independent and scoped to itself, so it won't leak to surrounding micro frontends or even the application container, there are techniques to ensure that on the run time like BEM or CSS-in-JS , or build time like SASS.
Finally, I do encourage you to start using micro frontends if you haven't alraedy, it's also currently being advised to adopt via ThoughtWorks.
Thanks for reading devspedia, I love you, and I'll see you the next time :)
This article was written by Gen-AI using OpenAI's GPT-3.
2162 words authored by Gen-AI! So please do not take it seriously, it's just for fun!